Programmatic Chatbots Creation and Deployment
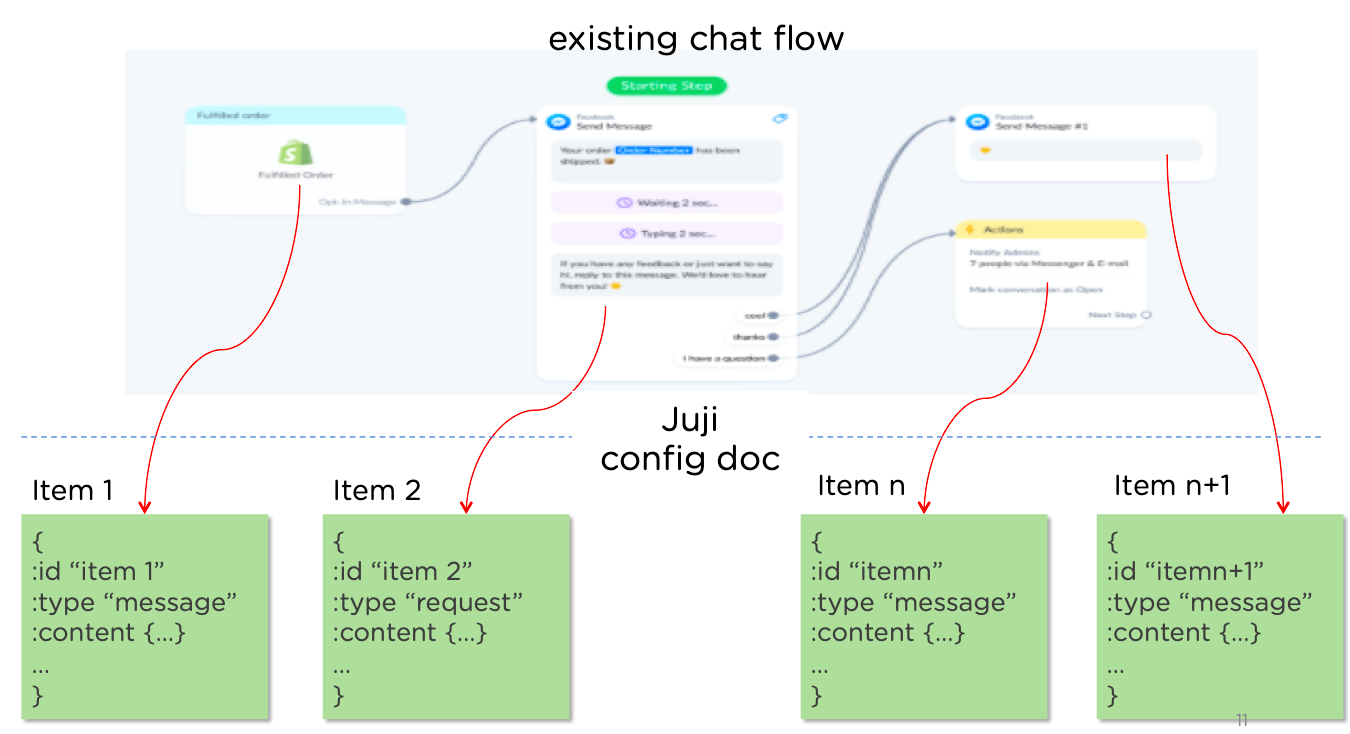
This guide is for users who enjoy Juji chatbot's powerful dialog management, but prefer to use their own user interfaces to create chatflow. For example, one can take an existing chat flow created in another platform, convert it to Juji's chatflow format. Then use Juji APIs to create and deploy the chatbot on Juji. In other words, it is possible to programmatically create and deploy chatbots on the Juji platform. You just need to follow three simple steps:
Create a Juji Account and Login
A valid Juji account is necessary for using most of the APIs. It is also the only step you have to complete using the Juji website. Simply go to Juji Signup page to create an account if you haven't yet done so.
Once you have an account, you can use the authenticate GraphQL mutation to log into your account and start a session.
mutation Authenticate($input: AuthenticateInput!){
    authenticate(input: $input) {
        token
    }
}
You may also need your account's brand id, you can use the following GraphQL query to access it.
query GetBrands{
    getBrands{
        name
    }
}
Create a Chatbot and Customize It
A chatbot lives in an engagement. In order to customize a chatbot, you either creates an engagement or uses an existing engagement.
// To create engagement with default blank template
mutation CreateEngagement($input: CreateEngagementInput!){
    createEngagement(input: $input) {
        engagement{
            name
            id
            order
            status
        }
    }
}

// To list existing engagements
query Engagements($brandName: String!) {
    getEngagementsByBrand(brandName: $brandName) {
        name
        id
        order
        status
    }
}
Then you can 1) update your chatflow by uploading a customized config-doc and/or 2) update your Q&As by uploading a customized Q&A csv file.
// Set isJson to true if the the config-doc is in JSON format,
// otherwise, Clojure EDN format is expected.
mutation UpdateChatConfig($input: UpdateChatConfigInput!){
    updateChatConfig(input: $input) {
        message
        success
    }
}
To update your Q&As, you will need to send a POST request. Below is a cURL snippet generated from Postman.
# overwrite is optional, remove it if you want to add the Q&As onto existing ones
curl --location --request POST 'https://juji.ai/api/faq-upload/<brand-id>/<engagement-order>' \
--header 'authorization: Bearer <token>' \
--form 'overwrite=1' \
--form 'file-content=ID,Question,Answer,Comment,Multi-turn Q&A,# of asking
help,Help,Here comes help!,,,
help,Can you help me?,,,,'
Launch Your Chatbot
Once the chatbot is ready, you can deploy it by creating a web release.
mutation CreateRelease($input: CreateReleaseInput!){
    createRelease(input: $input) {
        id
        order
        type
    }
}
The web release can be accessed at https://juji.ai/pre-chat/<engagement-id> using a browser or API calls. Please refer to the Juji chat API for details on how to use API calls to build conversational AI applications.
You can continue to improve your chatbot after you have made a release - simply update your config-doc and/or Q&As and then make a new release. The pre-chat URL above will always point to the latest web release.
References
- Please read about Juji API introduction first for important API concepts to help you better understand this guide. Additional API documentation, such as data model and Juji Cognitive Core API
- Juji's GraphiQL can be used to explore existing GraphQL APIs and their parameters.
- Juji client github page contains concrete examples written in JavaScript for all the API calls in this guide, please refer to it for detail.